About Me

I CT For


Monday, September 2, 2013
Whimsy

This tutorial was written by me on September 2nd, 2013 and is my own creation. Any resemblance to any other tutorial is purely coincidental and unintentional.
PS Version used: PS CS3 Extended and can be easily converted to PSP versions.
This tutorial assumes you have a good working knowledge of PS & PSP.
Supplies:
Tube of choice. I am using the beautiful art of Alex Prihodko. You can find his work here.
FTU kit Whimsy by Inzpired Creationz. This is only available as a fan freebie from Pimp My Tags w/ Scraps. You can grab it here.
Mask 3 by Alexis of the Creative Misfits. You can find it here.
Font of choice. I am using KG Call Me Maybe.
--------------------
Open a blank transparent image, 600 x 600. Open paper 5 and drag onto the blank image.
Open your mask and apply your mask. If you don't know how to to this in PS, you can find instructions here.
Open Frame 2. Image size 500 x 500. Drag this on top of the mask layer.
Use the Polygonal Lasso tool and make a selection along the pink flowers, making sure you won't be able to see the edges of the selection through the frame. Add a new layer.
Open paper 3. Copy and paste the paper. Selections, invert and press delete. Ctrl + D. Move this layer below the frame layer.
For the rest of the tag, you will work from the layer just above your frame to the top, using my tag as a guide for the placement. After each element I will note the pixel size to resize to.
Tube - resize as necessary
Grass 1 - 419 x 211
Ribbon 1 - 550 x 502
Butterflies 2 - 271 x 410
Butterflies 1 - 298 x 196
Jar - 181 x 243
Mushrooms 1 - 183 x 168
Bow - 132 x 129, rotate slightly to the left
Wordart - 550 x 463
Fairy - 210 x 270, flip horizontal
Add your name, copyrights, and license info. Apply a drop shadow of choice to your layers and merge visible.
For PS users: To ensure there are no stray pixels, increase your canvas size to 700 x 700. Add a layer, floodfill with a dark color and move the layer below your tag layer. Use your eraser tool to erase anything that isn't part of the tag (you may see extra paper at the edges or a thin line). When you're done, delete the dark color layer.
Save as a PNG.
Thanks for checking out my tutorials.
Saturday, August 31, 2013
New Orleans Sophistication Extras
Ready for some extras? I created these using A Simply Sassy Scrap Creation's New Orleans Sophistication PTU kit.
*Click on the image to get the full size.*
*Click on the image to get the full size.*


Thursday, August 29, 2013
New Orleans Sophistication Cluster Frame
I have been working with A Sassy Scrap Creation's New Orleans Sophistication kit...it's such a beautiful kit! And the preview of the kit just doesn't do it justice!

You can grab this beautiful cluster here.
Monday, August 26, 2013
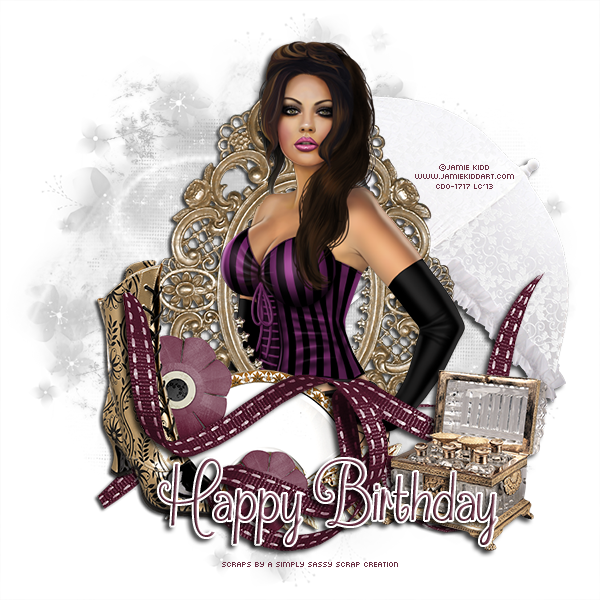
Sophistication

This tutorial was written by me on August 26th, 2013 and is my own creation. Any resemblance to any other tutorial is purely coincidental and unintentional.
PSP Version used: PSP X5, but should work in other versions.
This tutorial assumes you have a good working knowledge of PSP.
Supplies:
Tube of choice. I am using the stunning work of Barbara Jensen. You can purchase her tubes here.
PTU kit New Orleans Sophistication by A Simply Sassy Scrap Creation. You can purchase this kit here.
Gemsmask 143 by Gems Taggin' Scraps. You can find it here.
Font of choice. I am using Great Vibes.
--------------------
Open a blank transparent image, 600 x 600. Open your mask & PP11. Copy and paste your paper as a new layer onto your blank canvas. Apply your mask, merge group. Duplicate, and then merge down.
Open Frame3. Resize by 55%. Copy and paste as a new layer.
With your magic wand, click inside your frame. Selections, modify, expand by 10.
Open PP14. Copy and paste as a new layer. Selections, invert and press delete. Deselect and move this layer below your frame layer.
Open your tube and resize as necessary. Copy and paste as new layer above the paper layer. Flip horizontal and place to your liking over the paper layer. On the paper layer, select all, float, defloat. On the tube layer, selections, invert and press delete. Deselect.
Duplicate your tube, gaussian blur 3.00. Set the blend mode to Screen. On the original tube layer, set the blend mode to Luminance (L), opacity 55.
Open Swirl7. Resize by 69%, flip horizontal. Copy and paste as a new layer above the frame layer. Place to the bottom of the frame. Duplicate, flip horizontal, then vertical and place to the top of the frame.
Open the Corset. Resize by 40%. Copy and paste as a new layer. Place to the lower left.
Open the BlueBeads. Resize by 40%, flip horizontal, then vertical. Copy and paste as a new layer. Place to the top right.
Open HangingLamp2. Resize by 40%. Copy and paste as a new layer. Place to the top right corner of the frame.
Open Button4. Resize by 13%. Copy and paste as a new layer. Place to the top right corner of your frame. Erase any part of the lamp chain that is above the button.
Open the Bust. Resize by 40%. Copy and paste as a new layer. Place to the lower right.
Open your tube again and resize as necessary. Copy and paste as a new layer. Place slightly to the right.
Open Swirl3. Resize by 79%. Copy and paste as a new layer. Place to the bottom.
Open Brooch2. Resize by 20%. Copy and paste as a new layer. Place in the center of swirl3.
Open Mask2. Resize by 25%. Copy and paste as a new layer. Place to the lower right.
Add your name (I used PP5 as the pattern for the text), copyright, & license info.
Apply a drop shadow of choice. Merge visible and save as a PNG.
Thanks for checking out my tutorials.
Friday, August 23, 2013
Sweet Steampunk

This tutorial was written by me on August 23rd, 2013 and is my own creation. Any resemblance to any other tutorial is purely coincidental and unintentional.
PSP Version used: PSP X5, but should work in other versions.
This tutorial assumes you have a good working knowledge of PSP.
Supplies:
Tube of choice. I am using the beautiful work of VeryMany. You can purchase this tube here.
PTU kit, Sweet Steampunk, by Inzpired Creationz. You can purchase this kit here.
Mask 1 by me. You can find it here.
Font of choice. I am using Ventography.
--------------------
Open a blank transparent image, 600 x 600.
Open paper 17 and your mask. Copy and paste your paper as a new layer onto your blank canvas. Apply your mask, merge group. Duplicate once and then merge these two mask layers together.
Open Frame 4. Resize by 67%. Copy and paste as a new layer. Rotate 90 degrees clockwise. Now take your pick/raster deform tool and rotate slightly to the left so it is at an angle.
With your magic wand tool, click inside the frame. Selections, modify, expand by 5.
Open paper 13. Copy and paste as a new layer. Selections, invert, & press delete. Deselect.
Open Frame 3. Resize by 50%. Copy and paste as a new layer. Place to the top right of the square frame. Move this frame below the square frame & paper layer. See below for placement.

With your magic wand, click inside the smaller frame. Selections, modify, expand by 5. Open paper 3. Copy and paste as a new layer. Selections, invert, and press delete. Deselect and move this layer below the circle frame.
Open your tube and resize as necessary. Copy and paste as a new layer above the circle paper layer. Flip tube horizontally and place over the paper. Erase any part of the tube that shows outside the circle frame.
Duplicate your tube, gaussian blur 3.00, blend mode Screen. On the original tube layer, opacity 45.
Copy and paste your tube again, just above the square paper layer. Place to your liking. Erase any part that extends past the square frame. Duplicate your tube, gaussian blur same settings as before. Blend mode Screen, opacity 55. On the original tube layer, opacity 45.
Open Bling 1. Resize by 60%. Copy and paste as a new layer just below the square frame layer. Duplicate and arrange the two copies to your liking.
Open Ribbon 1. Resize by 81%. Copy and paste as a new layer above the square frame layer.
Open the Feathers. Resize by 81%. Copy and paste as a new layer.
Open the Books. Resize by 40%. Copy and paste as a new layer. Place over the loop of the ribbon.
Open Clock 2. Resize by 40%. Copy and paste as a new layer. Place to the bottom left, below the books.
Open the Umbrela. Resize by 60%. Copy and paste as a new layer. Rotate slightly to the right and place to the bottom of the circle frame.
Open your tube again. Copy and paste as a new layer, resize as necessary. Place slightly to the right.
Open the Cog and Wings. Resize by 50%, flip horizontal. Copy and paste as a new layer. Place to the bottom.
Open the Feather. Resize by 50%. Copy and paste as a new layer. Pick tool/raster deform and rotate till it lays flat. Place to the bottom right. Duplicate, flip horizontal. Place to the upper left of the square frame. Now move the duplicate feather below the umbrella layer.
Open Bow 2. Resize by 40%, flip horizontal. Copy and paste as a new layer above the original feather layer. Place to the bottom of the clock.
Open the Boot. Resize by 40%, flip horizontal. Copy and paste as a new layer. Place to the bottom right.
Open Roses 2. Resize by 50%. Copy and paste as a new layer. Place over the bottom feather, allowing some of the feather to show. Duplicate the roses, flip vertical. Place to the top left of the square frame, allowing some of the feather at the top to show through. Now move the duplicate roses layer down just below the umbrella layer.
Open the Antiseptic. Resize by 40%. Copy and paste as a new layer above the original roses layer. Place to the bottom left.
Open Butterfly 3. Resize by 40%. Copy and paste as a new layer. Use your pick/raster deform tool to rotate slightly to the left. Place to the top of the books.
Open Sparkles 1. Resize by 82%. Copy and paste as a new layer.
Open Sparkles 2. Resize by 80%. Copy and paste as a new layer.
Add your name, copyrights, license info. Apply a drop shadow of choice, merge visible. Save as a PNG.
Thanks for checking out my tutorials.
Sunday, August 18, 2013
Zombie Birthday Quickpage
I had originally planned to do two cluster frames with this kit, but changed my mind at the last minute. This is my very first quickpage so I understand if you don't like it.

You can download this cluster here.
Saturday, August 17, 2013
Zombie Birthday Cluster Frame 1
'Zombie Birthday' - A kit by Wicked Princess Scraps
This kit is so awesome...it certainly did feed my zombie addiction! Here is the first cluster frame that I've created from this kit.

You can download the frame here.
Subscribe to:
Posts
(Atom)
Grab My Blinkie
