About Me

I CT For


Sunday, September 9, 2012
Happy Fall
This tutorial was written by me on September 9th, 2012 and is my own creation. Any resemblance to any other tutorial is purely coincidental and unintentional.
PSP Version used: PSP9, but should work in other versions.
This tutorial assumes you have a good working knowledge of PSP.
Supplies:
Tube of choice. I am using the work of Ismael Rac. You can purchase his tubes here.
FTU October Fall kit by Twinky Dezines. You can download it from her blog here.
Template 179 by Addictive Templates. You can download it here.
BigMask008 by Vix. You can find it here.
Font of choice. I am using KG Call Me Maybe-skinny.
--------------------
Open your template and mask. Minimize your mask.
Delete the credits & background layers. Set the canvas size to 800 x800. Resize all layers by 75%.
Open paper 2. Copy and paste as a new layer. Move this layer to the bottom, apply your mask, merge group.
Raster 4 - select all, float, defloat. Open Paper13. Copy and paste as a new layer. Selections, invert and press delete. Deselect and delete Raster 4.
Merge together Raster 2 & 3. Select all, float, defloat. Open Paper6. Copy and paste as a new layer. Selections, invert and press delete. Deselect and delete the merged layer.
Raster 6 - select all, float, defloat. Open Paper10. Copy and paste as a new layer. Selections, invert and press delete. Deselect and delete Raster 6. Repeat for Raster 5.
Open your tube. Copy and paste your tube as a new layer below each frame. Place to your liking and then using your magic wand tool, click inside each frame. Selections, modify, expand by 2. On the tube layer, selections invert and press delete. Deselect.
Duplicate your tube, gaussian blur 3, set the blend mode to screen.
Remember to do this for both frames.
On both frame layers, select all, float, defloat. Add a new raster layer and floodfill with #b84737. Deselect and delete the original frame layers.
Raster 7 - select all, float, defloat. Open Paper2. Copy and paste as a new layer. Selections, invert and press delete. Deselect and delete Raster 7.
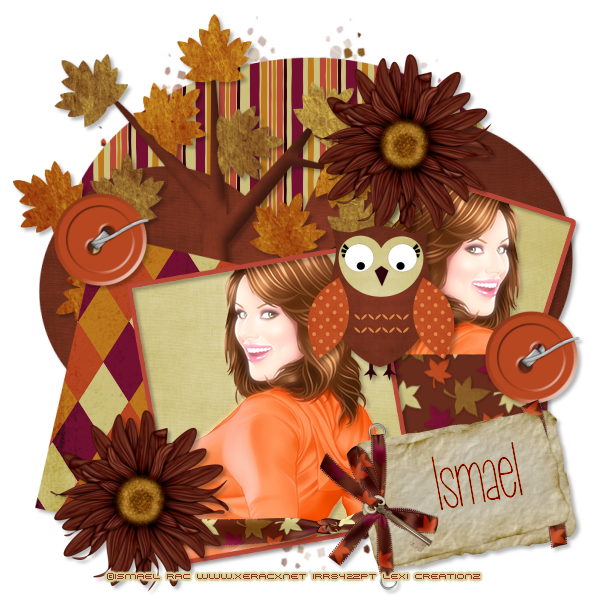
Open the Tree. Resize by 80%. Copy and paste as a new layer. Move slightly to the left.
Raster 8 - select all, float, defloat. Open Paper12. Copy and paste as a new layer. Selections, invert and press delete. Deselect and delete Raster 8.
Open Flower1. Resize by 40%. Copy and paste as a new layer. Move this layer to the top. Place to the upper left corner of the frame on the right side. Duplicate and place to the bottom left corner of the left frame.
Open TiedRibbon1. Resize by 50%. Copy and paste as a new layer. Place along the bottom of the frame on the left. Move this layer below the flower on the bottom. See my tag for reference.
Open Owl2. Resize by 30%. Copy and paste as a new layer. Place between the two frames, towards the top. See my tag for reference.
Open Button1. Resize by 40%. Copy and paste as a new layer. Place to the upper left corner of the argyle paper. Duplicate, mirror, and move slightly down. See my tag for reference.
Open the Notelet. Resize by 40%. Copy and paste as a new layer. Place to the bottom right of your tag.
Apply a drop shadow of choice.
Hide your mask layer and merge visible. Unhide your mask. Center your tag over your mask.
Add your name, copyright, and license info. Merge visible and save as a PNG.
Subscribe to:
Post Comments
(Atom)
Grab My Blinkie

0 comments:
Post a Comment