About Me

I CT For


Wednesday, August 22, 2012
Casino Royale
This tutorial was written by me on March 11th, 2012 and is my own creation.
Any resemblance to any other tutorial is purely coincidental and unintentional.
PSP Version used: PSP9, but should work in other versions.
This tutorial assumes you have a good working knowledge of PSP.
Supplies:
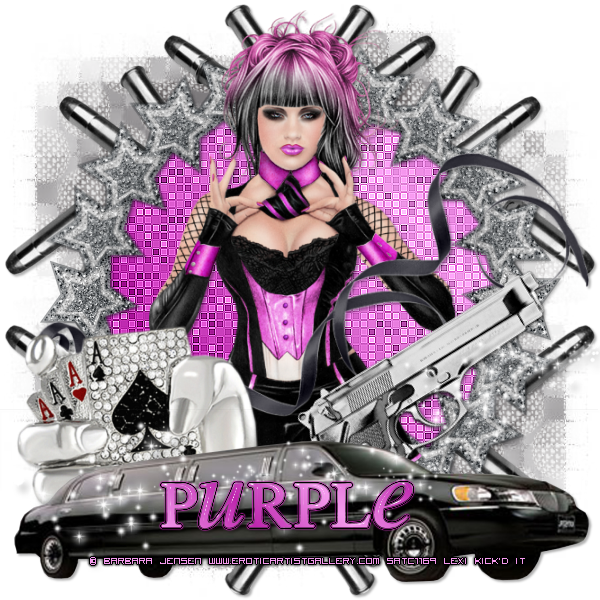
Tube of choice. I am using the sexy art of Barbara Jensen, a PTU artist. This tube is an exclusive at SATC called Mob Scene.
PTU Kit Mobsters by Purple's Kreationz. You can purchase this kit at Scrap Candy.
Mask 365 by VixPSP. You can download this mask here.
Font of choice. I am using Will and Grace.
Filters:
Xero Fritillary
EyeCandy 4000 Glass & Gradient Glow (optional)
Ok lets get started!
Open a blank transparent image 600 x 600.
Open your mask and minimize.
Open paper PK-M-P7. Copy and paste onto your blank canvas. Apply your mask, merge group.
With your raster deform tool, pull the edges of the mask layer to the edge of your canvas.
Open element PK-M-BULLETS. Copy and paste as a new layer. Move to the upper left hand side of your canvas. See mine for exact placement. Duplicate and mirror. Merge these two layers together. Now duplicate this layer and flip. Merge these layers together.
Open frame PK-M-F2. Copy and paste as a new layer.
Set your foreground to #be26ae and background to #f49aed. Click on your foreground color and select the gradient tab. Set to foreground/background gradient, linear style, angle 51, repeats 2, invert checked.
With your magic wand tool, click inside your frame. Selections, modify, expand by 10. Add a new raster layer and floodfill with the gradient.
Xero Fritillary. Change the amount to 8.
Effects, edge effects, enhance. Move this layer below your frame layer.
Open your tube. Resize if necessary. Copy and paste as a new layer.
Open element PK-M-RIBBON1. Image, mirror. Resize by 95%. Copy and paste as a new layer. Place at the bottom of your frame. See my tag for reference.
Open element PK-M-HANDS. Copy and paste as a new layer. Place in the lower left side of your tag. See my tag for reference.
Open element PK-M-GUN. Copy and paste as a new layer. Place to the lower right side of your tag. With your raster deform tool, turn it to the left to it's about 45 degrees turned.
Open element PK-M-LIMO. Copy and paste as a new layer and place towards the bottom of your tag. See mine for reference.
Open element PK-M-SPARKLES. Copy and paste as a new layer. Place over the limo.
Add your name. If desired add a glass effect with EyeCandy Glass. Then add a black gradient glow with EyeCandy Gradient Glow.
Add a slight drop shadow to the layers of your choice.
Add your name, copyright info, and license # if using a PTU tube.
Merge visible and save as a .PNG or .JPG.
I hope you enjoyed this tutorial!
Subscribe to:
Post Comments
(Atom)
Grab My Blinkie

0 comments:
Post a Comment